1 概要
2 调用逻辑
文件 Reblur_DiffuseSpecular.hpp,在 nrd::InstanceImpl::Add_ReblurDiffuseSpecular 里创建好所有 render pass
每个 pass 的名字使用宏 PushPass("PostFix")
设置,最后得到 pass name = DENOISER_NAME - PostFix
AddDispatch
的第一个参数指定shader文件名,而这个shader文件只是充当一个组织文件,预定义一些宏,控制降噪走的分支,
实际的代码在其 include 的 shader 文件中。对于 REBLUR_DiffuseSpecular
会走 REBLUR_DIFFUSE 与 REBLUR_SPECULAR
两个分支
reblur 配置 nrd::ReblurSettings m_ReblurSettings
,更新在 InstanceImpl::Update_Reblur
shader参数:
REBLUR_SHARED_CB_DATA在InstanceImpl::AddSharedConstants_Reblur中更新- pass参数的更新在
InstanceImpl::Update_Reblur
3 渲染逻辑
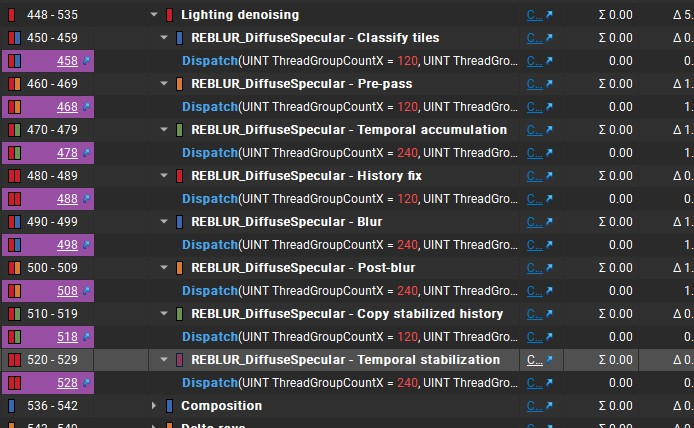
3.1 Classify tiles
识别需要降噪的tile
3.2 Pre-pass
准备 pre-blur 参数
3.2.1 depth-based bilateral weight
float2 wc :depth-based bilateral
weight,使用左右两个像素viewZ0、viewZ1与当前像素的viewZ的相对差异。对相对差异施加一个cut
off,限制在[0, cut_off]范围内。当相对差异超过阈值 0.03 时,权重为
0;当相对差异<=0时,权重取 1;其余在 0~1 之间。
1 | float2 viewZ01 = float2(viewZ0, viewZ1); |
3.2.2 Checkboard模式处理
当为 RESOLUTION_HALF 时,checkerboard mode 为
CheckerboardMode::WHITE(2)、diffCheckerboard(1)、specCheckerboard(0);否则为
OFF(0),diffCheckerboard(2)、specCheckerboard(2)。当为半屏模式时,经过pre
pass可以得到全屏结果。
uint checkerboard:0/1 值,使用像素坐标与帧数得到,相邻像素交错,相邻帧交错1
2
3
4
5uint CheckerBoard( uint2 samplePos, uint frameIndex )
{
uint a = samplePos.x ^ samplePos.y;
return ( a ^ frameIndex ) & 0x1;
}int3 checkerboardPos:1/2 屏幕坐标(横坐标缩减一半)。x、z 取当前像素的左右相邻像素横坐标,y取当前像素坐标,最后横坐标右移一位1
2int3 checkerboardPos = pixelPos.xyx + int3( -1, 0, 1 );
checkerboardPos.xz >>= 1;checkboard 模式处理,如文件 NRDSettings.h 描述,当为半屏的 checkboard 模式时,noisy input在左半部分。
hasData表示当前像素是否有有效数据,使用交错处理。1
2
3
4
5if(gDiffCheckerboard/*\gSpecCheckerboard*/ != 2){ // 半屏的交错模式
hasData = checkerboard == gDiffCheckerboard/*\gSpecCheckerboard*/; // checkerboard 交错得到有效/无效数据
pos.x >>= 1; // 1/2 屏幕
}
REBLUR_TYPE diff = gIn_Diff[pos]; /*REBLUR_TYPE spec = gIn_Spec[pos];*/
3.2.3 准备当前像素的数据
N(世界空间法线)、Nv(view
space下的法线)、roughness、Vv (View space 下的view
vector)、Xv (像素在view space下的position)
float4 rotator :每帧生成的向量,用于 Poisson
采样。REBLUR_PRE_BLUR_ROTATOR_MODE 取
NRD_FRAME ,这里 rotator 取的是 CPU 传来的。
3.2.4 执行 Pre-blur
diffuse 与 specular 有各自的 spatial filter,参考下一章节。
3.3 Temporal accumulation
3.3.1 Preload与数据准备
将 tile (GROUP_X + BORDER * 2) x (GROUP_Y + BORDER * 2) 的 normal hitdist 数据加载到
s_Normal_MinHitDist[GROUP_X+BORDER*2][GROUP_Y+BORDER*2]中,减少后续重复访问 texture。在当前像素的 (BORDER * 2) x (BORDER * 2) 区域计算
Navg(averaged normal) 与hitDistForTracking(取最小)。注意:
threadPos+BORDER对应了当前像素在 s_Normal_MinHitDist 中的位置,因此循环中跳过了 (i== BORDER && j == BORDER)但是,Navg 的计算只包含了以当前像素为右下角的四个像素,而 hitDistForTracking 则遍历了以当前像素为中心的 3x3 区域。不懂这个设计
准备当前像素的数据
float3 N(世界空间法线),float materialID,Xv(view space坐标),X(相机无平移变换时的世界空间坐标),roughness
3.3.2 变换
Temporal 处理时需要进行world、view、clip以及到上一帧的变换,比较特殊的一点,本阶段使用的变换将camera的平移都取消掉了。
常规的变换对应了 CommonSettings 中的
viewToClipMatrix()、worldToViewMatrix()等一系列矩阵,而传给shader的变换实际是
InstanceImpl 里的
m_ViewToClip()、m_WorldToView()、m_ViewToWorld()、m_WorldToClip()。将view
space的平移整体取消,即 world 与 view 之间的变换的平移。而 world
到上一帧view 以及 view 到上一帧world
之间的变换采用相机的运动矢量,即相对偏移。
1 | m_ViewToWorld.SetTranslation(ml::float3::Zero()); |
上面一系列做法相当于永远将当前帧相机至于世界原点位置,因此 view 到
world
的变换只需要执行旋转变换。为了便于理解,后续描述也直接忽略相机平移。例如
Xv 是像素在view space下的坐标,而下面应用从view 到
world旋转得到的 X 称为像素的世界空间坐标。
1 | float3 X = STL::Geometry::RotateVector(gViewToWorld, Xv); |
因此,通过变换到三位空间得到的点,既是三维空间坐标,又是点到相机的向量。
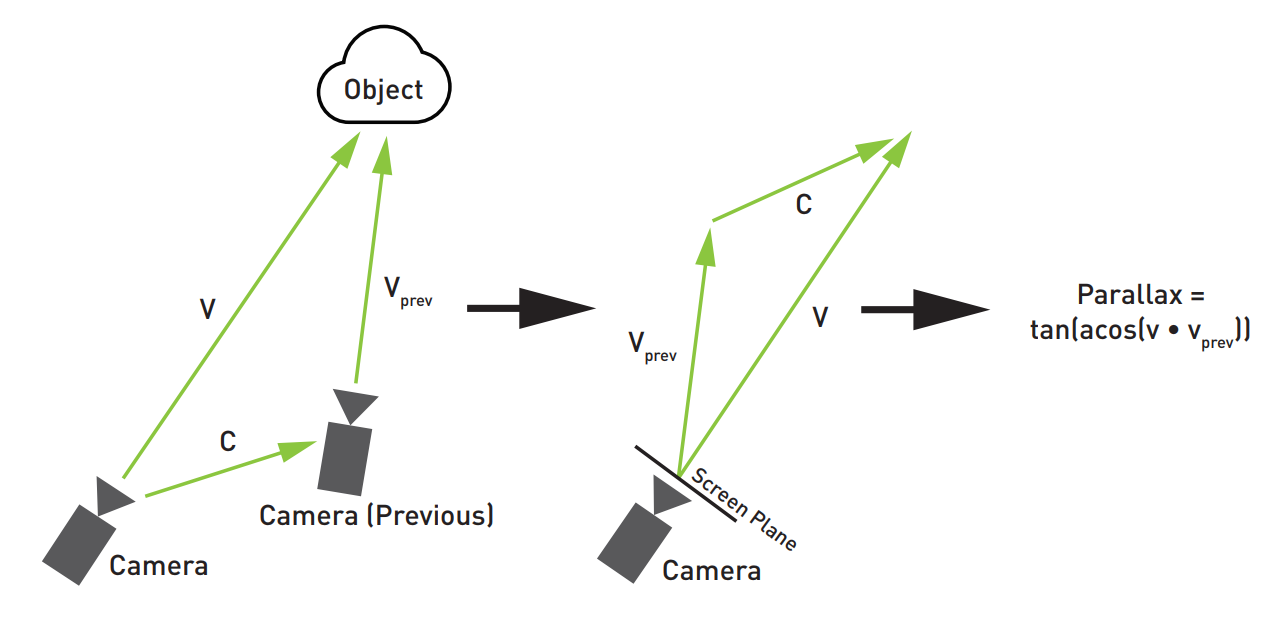
3.3.3 计算视差
视差(parallax)是指比较两个观察方向(世界空间)的差距大小。观察方向是相机到着色点的方向,因此视差是针对某一着色点而言的。只有当相机发生了位置变化,才会产生视差。在相同的相机运动下,不同着色点具有不同的视差。因此计算视差要固定着色点,如下图所示,相机运动向量
\(\vec{c}\),运动前后的观察方向 \(\vec{v},\vec{v}_{prev}\),可以得到视差度量定义
\[
parallax = \tan\big(\arccos(\vec{v} \cdot \vec{v}_{prev})\big)
\]
Xprev上一帧位置:处理animation带来的运动,计算着色点在上一帧的世界空间坐标gIn_Mv应该是物体animation带来的motion vector(mv可能是世界空间下、也可能是uv空间下),测试例子里都是 0;gMvScale取值 C++ 的 motionVectorScale,gIsWorldSpaceMotionEnabled = 0。世界空间下 (gIsWorldSpaceMotionEnabled ! = 0):Xpre += mv 得到上一帧的位置
motionVectorScale = (1.0, 1.0, 0.0)
uv空间下:mv.xy 为 uv 的运动,uv.z 为深度的运动,(此时为 25D) motionVectorScale = (1.0/width, 1.0/height, 1.0)
因此在上一帧的像素uv:
smbPixelUv = pixelUv + mv.xy与深度 (viewZ + mv.z)变换得到上一帧的世界坐标:
Xprev = RotateVectorInverse(...) + gCameraDelta。RotateVectorInverse 只处理了相机旋转(应该是旋转矩阵的逆等于转置,避免求逆)。gCameraDelta 是指向上一帧的运动向量,而这里的变换都是以当前帧相机为世界原点,因此加上 gCameraDelta 最终得到上一帧的世界空间坐标。注意:Xprev 是着色点在上一帧的世界坐标,因此如果着色点没有动画,那么 Xprev 与着色点在当前帧的世界坐标应该一样
smbParallaxInPixels与上一帧之间的视差(像素为单位的距离)ComputeParallaxInPixels(Xprev - gCameraDelta, pixelUv, gWorldToClip, gRectSize )
gCameraDelta即相机在世界空间指向上一帧的运动向量 prev - current。Xprev - gCameraDelta = Xprev + (-gCameraDelta):相当于保持相机位置不同,向着色点施加上一帧指向当前帧的相机平移运动
再执行
gWorldToClip变换得到当前相机下的uv。像素在上一帧的世界坐标 Xprev 施加了相机运动并变换到当前帧的uv,此时与 pixelUv 处于同一相机下,如上图右侧。因此可以计算二者之间的像素距离
3.3.4 历史数据重投影
时序累积是将当前帧与历史帧结合得到更稳定的结果。需要将当前帧重投影到上一帧,从历史数据中得到可靠的对应,并以一定权重将当前帧更新到历史帧中。为此,需要考虑:
- disocclusion tracking:当前帧像素是否发生去遮挡,即新出现的像素。
- accumulate speed:当前帧像素与历史帧像素结合的权重。
reblur的重投影结合了 surface motion based 与 virtual motion based(仅用于specular) 两种方法,下面先介绍surface motion
3.3.4.1 Surface motion based reprojection
(1)Disocclusion Tracking
前面已经通过重投影或者motion
vector找到当前帧像素pixelUv对应上一帧像素smbPixelUv,通过比较当前帧与上一帧之间view
z的差异是否超过阈值,如果超过则表示像素不匹配。此外,这个过程是基于Catmull-Rom
filter与bilinear
filter进行的,对于匹配的历史信息使用filter结果与当前帧进行混合。
disocclusion threshold:输入
gDisocclusionThreshold,其在 C++ 上的数值计算如下1
2float disocclusionThresholdBonus = (1.0f + m_JitterDelta) / float(rectH);
float disocclusionThreshold = m_CommonSettings.disocclusionThreshold + disocclusionThresholdBonus; // 0.01 + 抖动值m_JitterDelta 是相邻两帧camera jitter的差值,camera jitter则是每帧的halton抖动值 [-0.5,0.5]
先乘上 frustumSize 得到 disocclusionThresholdMulFrustumSize,基于
NoV与视差调整阈值,视差越大,阈值越低1
float smbDisocclusionThreshold = disocclusionThresholdMulFrustumSize / lerp(0.05 + 0.95 * NoV, 1.0, saturate(smbParallaxInPixels/30.0));
上一帧uv是否在屏幕内,以及上一帧uv是否正面朝向。若不是,则 smbDisocclusionThreshold 取 -1,那么之后的occlusion判断都不通过
- 是否正面朝向,通过上一帧与当前帧的法线夹角判断。因为当前帧肯定是正面朝向,如果法线夹角不超过一定值则视上一帧也是正面朝向。
- 夹角cos阈值
frontFacing:lerp(cos(STL::Math::DegToRad(135.0)), cos(STL::Math::DegToRad(91.0)), saturate(2*smbParallaxInPixels-2)) - 法线夹角采用当前帧/上一帧像素的bilinear区域法线均值:dot(prevNavg, Navg) > frontFacing;
- 夹角cos阈值
- 是否正面朝向,通过上一帧与当前帧的法线夹角判断。因为当前帧肯定是正面朝向,如果法线夹角不超过一定值则视上一帧也是正面朝向。
在Catmull-Rom filter区域与bilinear filter区域进行occlusion判断,并生成occlusion weight。当catmull-rom区域不匹配时,则降为使用occlusion weight的bilinear区域。Catmull-Rom区域为4x4,中间2x2对应了bilinear区域,定义如下
1
2
3
4
5
6
7
8
9
10
11
12
13
14
15
16
17/*
Gather => CatRom12 => Bilinear
0x 0y 1x 1y 0y 1x
0z 0w 1z 1w 0z 0w 1z 1w 0w 1z
2x 2y 3x 3y 2x 2y 3x 3y 2y 3x
2z 2w 3z 3w 2w 3z
CatRom12 => Bilinear
0x 1x
0y 0z 1y 1z 0z 1y
2x 2y 3x 3y 2y 3x
2z 3z
*/
struct CatmullRom
{
float2 origin;
float2 weights[4];
};通过GatherRed提取上一帧像素smbPixelUv的
smbCatromFilter区域的view z数据。smbCatromGatherUv为gather 0x的左上角,而 GatherRed 采样得到的是 bilinear 区域的4个像素,顺序如下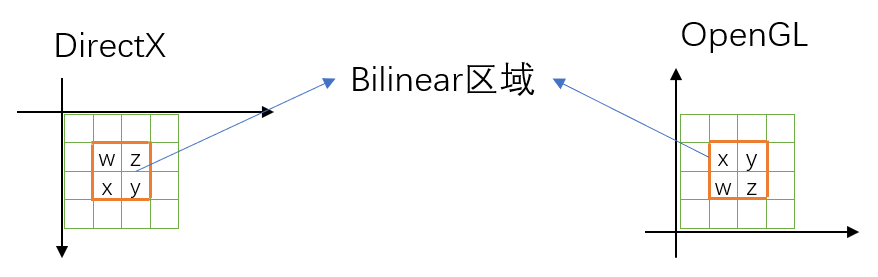
通过 GatherRed 的以下偏移量取wzxy,正好对应上面 Gather 区域(注意首数字 0123 表明了屏幕坐标轴方向),有
(1, 1): smbViewZ0 = (0x, 0y, 0z, 0w)。取yzw,prevViewZ0 = (0y, 0z, 0w)
(3, 1): smbViewZ1 = (1x, 1y, 1z, 1w)。取xzw,prevViewZ1 = (1x, 1z, 1w)
(1, 3): smbViewZ2 = (2x, 2y, 2z, 2w)。取xyw,prevViewZ2 = (2x, 2y, 2w)
(3, 3): smbViewZ3 = (3x, 3y, 3z, 3w)。取xyz, prevViewZ3 = (3x, 3y, 3z)
比较view z的差异判断Catmull-Rom区域的occlusion,并生成其中bilinear区域的occlusion weights,以及bilinear区域的可信度(用于之后的累积速度)。
Xprev变换到上一帧的view space得到Xvprev.z(注意:这是当前帧像素 PixelUv 的着色点在上一帧坐标空间下的坐标)。如果差异绝对值超过 smbDisocclusionThreshold,则认为像素不匹配,取0;否则取1。最后可得到 smbOcclusion0、smbOcclusion1、smbOcclusion2、smbOcclusion3。计算bilinear区域的
smbOcclusionWeights1
float4 smbOcclusionWeights = GetBilinearCustomWeights(smbBilinearFilter, float4(smbOcclusion0.z, smbOcclusion1.y, smbOcclusion2.y, smbOcclusion3.x))
Catmull-Rom区域是否匹配,只有匹配时后续才会对历史信息进行 Catmull-Rom filter。
1
bool smbAllowCatRom = dot(smbOcclusion0 + smbOcclusion1 + smbOcclusion2 + smbOcclusion3, 1.0) > 11.5
bilinear区域的可信度
smbFootprintQuality:对 occlusion 进行 smbBilinearFilter 再开方得到,用以之后调整累积速度(越大越倾向于历史信息)。应对视角变化,对于可信度进行调整。例如相机斜对着表面(NoVPrev<1)变为正对着(NoV=1),那么历史信息相对当前帧可信度下降1
2
3
4float sizeQuality = (NoVprev + 1e-3) / (NoV + 1e-3);
sizeQuality *= sizeQuality;
sizeQuality = lerp(0.1, 1.0, saturate(sizeQuality));
smbFootprintQuality *= sizeQuality;
处理材质变化,如果材质ID不匹配,那么视为像素不匹配
上一帧像素的bilinear区域得到的prevMaterialIDs,与当前像素materialID比较,得到
float4 materialCmps(相同为1,不同为0),bilinear区域的occlusion乘上 materialCmps 后再计算上述occlusion值,得到smbOcclusionWeightsWithMaterialID、smbAllowCatRomWithMaterialID、smbFootprintQualityWithMaterialID
上一帧像素 smbPixelUv 的 bilinear 区域
smbBilinearFilter使用 linear 采样法线得到上一帧
prevNavg,再转到当前帧世界坐标(gWorldPrevToWorld,本例为单位阵)收集 smbBilinearFilter 区域4个像素的 diffAccumSpeeds、specAccumSpeeds、prevMaterialIDs。
3.3 History fix
3.3.1 Preload与数据准备
与 temporal accumulation 阶段相同,将tile (GROUP_X + BORDER * 2) x
(GROUP_Y + BORDER * 2) 加载到
float2 s_FrameNum[BUFFER_Y][BUFFER_X]
中,即累积的帧数(x为diffuse、y为specular)。本阶段的 BORDER 为 2。
提取当前像素数据:N(世界空间法线)、roughness、Xv(view
space坐标)、Nv(view space法线)
3.3.2 平滑累积帧数
从 preload 数据中获取当前像素的累积帧数
float2 frameNumUnclamped,当前像素在 preload 数据中的位置
int2 smemPos = threadPos + BORDER;
再使用 gHistoryFixFrameNum 进行归一化得到
normFrameNum。
在当前像素的 (BORDER * 2 + 1) X (BORDER * 2 + 1)
区域,对归一化累积帧数超过当前像素的样本取平均,得到
normFrameNum。 权重为
1 | float2 w = step(c, s); // c 是当前像素归一化后的累计帧数,s是当前样本归一化后的累积帧数 |
最终得到
float2 scale = saturate(1.0 - normFrameNum);
gHistoryFixFrameNum 作为累积帧数阈值,scale相当于累积帧数不足的比例,history fix会对scale超出一定阈值执行。
float2 frameNum = normFrameNum * gHistoryFixFrameNum;
4 Diffuse Denoise Pipeline
5 Specular Denoise Pipeline
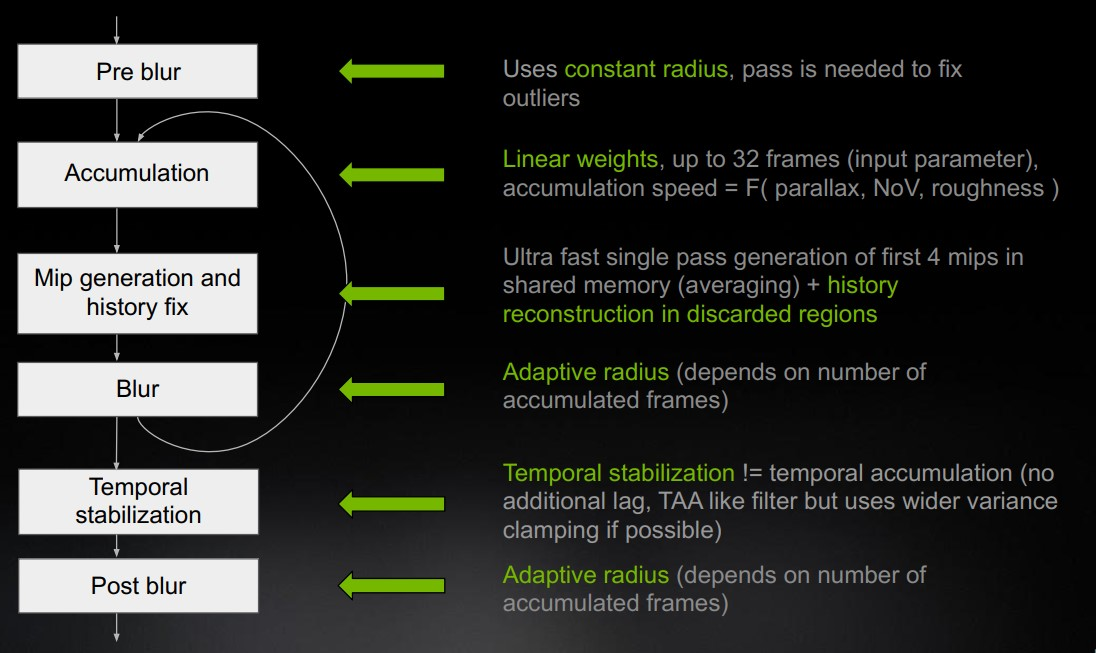
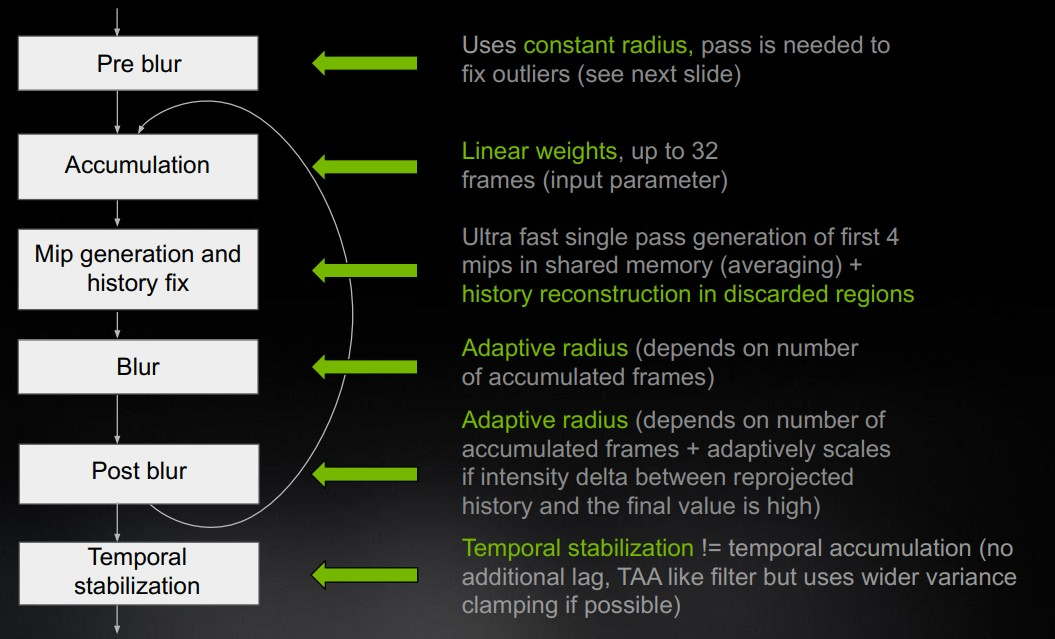
5.1 Pre blur
5.1.1 一些默认参数
- 宏定义的默认参数
REBLUR_SPATIAL_MODE == REBLUR_PRE_BLURREBLUR_PRE_BLUR_NON_LINEAR_ACCUM_SPEED1/9REBLUR_PRE_BLUR_FRACTION_SCALE2.0 - CPU传入的可调参数 gSpecPrepassBlurRadius 默认 50.0 lobeAngleFraction
默认 0.15 roughnessFraction 默认 0.15 resolutionScale 默认 (1.0, 1.0)
gPlaneDistSensitivity 默认 0.005 gMinRectDimMulUnproject :
(float)ml::Min(rectW, rectH) * unproject
5.1.2 blur策略
blur平面的选择:这里选用世界空间的blur平面,与 Reflected GGX-D 垂直,可以更多保留特征
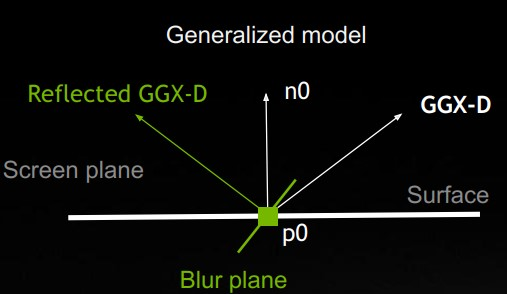
blur半径的选择:由下图可以看出,反射物体离着色点越近,特征越明显,越远越模糊;此外越粗糙,specular lobe夹角越大,反射也会越模糊。因此反射距离越远、着色点越粗糙,对应越大的blur半径。
也就是说,specular lobe与反射物体形成的锥形底面的直径越大,对应的blur半径越大。


5.1.3 blur radius计算
float hitDist:基于roughess与viewZ 进行一定缩放,roughness 越小 scale 越大。scale 定义如下1
2
3
4
5float _REBLUR_GetHitDistanceNormalization(float viewZ, float4 hitDistParams, float roughness = 1.0)
{
return (hitDistParams.x + abs(viewZ) * hitDistParams.y) * lerp(1.0, hitDistParams.z,
saturate(exp2(hitDistParams.w * roughness * roughness)));
}其中 gHitDistParams 定义如下
1
2
3
4
5
6
7struct HitDistanceParameters
{
float A = 3.0f; // 来自 hitDistScale * meterToUnitsMultiplier,默认为 3.0 * 1.0。大概是米到单位值的变换
float B = 0.1f; // (> 0) - viewZ based linear scale (1 m - 10 cm, 10 m - 1 m, 100 m - 10 m)
float C = 20.0f; // (>= 1) - roughness based scale, use values > 1 to get bigger hit distance for low roughness
float D = -25.0f; // (<= 0) - absolute value should be big enough to collapse "exp2(D * roughness ^ 2)" to "~0" for roughness = 1
};lobeRadius:反射lobe形成的锥形底面的半径Specular lobe的主方向
float4 Dv:(GGX Dominant Direction, lerp factor) 见附录NoD法线与 Dv 的夹角余弦计算lobe夹角正切
float lobeTanHalfAngle:根据roughness估算specular lobe的半角正切 [1](page 72)估算lobe半径大小
1
float lobeRadius = hitDist * NoD * lobeTanHalfAngle; // 没看出有什么精确的几何变换,更像是一个近似模型
转换为像素单位: 世界空间半径 / 一个像素对应的世界空间大小。像素对应的世界空间大小,与像素的深度有关,即投影到 viewZ 处的截面
1
2
3
4
5
6minBlurRadius = lobeRaidus / PixelRadiusToWorld(gUnproject, gOrthoMode, 1.0, viewZ + hitDist * Dv.w);
// 将屏幕空间以像素为单位的半径投影回视锥体 viewZ 处的截面上的几何半径
float PixelRadiusToWorld(float unproject, float orthoMode, float pixelRadius, float viewZ)
{
return pixelRadius * unproject * lerp( viewZ, 1.0, abs( orthoMode ) );
}gUnproject:1.0f / (0.5f * rectH * project[1]); project[1] 计算的是 \(\frac{1}{\tan\alpha_1}\)
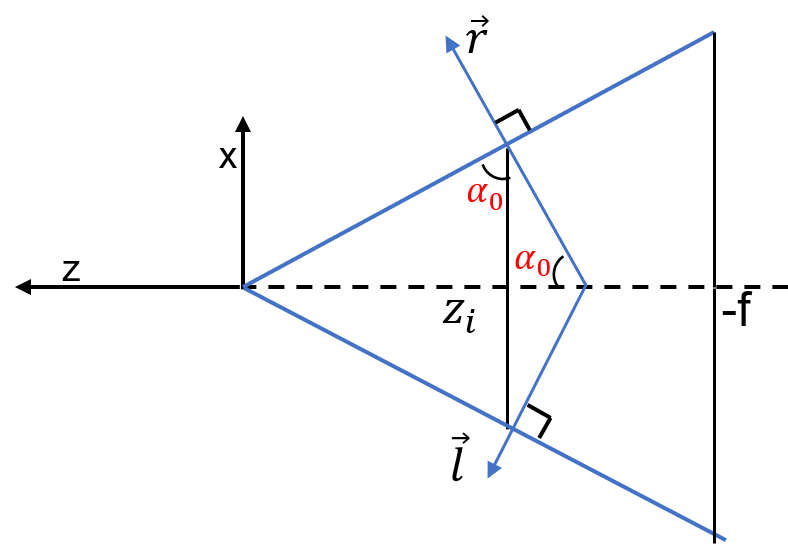

视锥体在 viewZ 处的截面高度为 \(2 * viewZ * \tan\alpha_1\),因此与屏幕高度的比值为 \[ \begin{align} & 2 * viewZ * \tan\alpha_1 * \frac{1}{rectH} = 2 * viewZ * \frac{1}{project[1]} * \frac{1}{rectH} \\ & = viewZ * \frac{1}{project[1] * 0.5 * rectH} \end{align} \] 因此屏幕空间像素乘上以上比值,可以投影回viewZ处,得到几何半径。
blurRadius:使用一个 hitDistFactor 与 specular magic curve 缩放输入radius参数。不理解原理 :question: :confused:float hitDistFactor = hitDist * NoD / frustumSize并 clamp 到 0~1float frustumSize:(2 / aspect) * viewZ,视锥体在 viewZ 处截面的高度 :confused: :question:1
2
3
4float GetFrustumSize(float minRectDimMulUnproject, float orthoMode, float viewZ)
{
return minRectDimMulUnproject * lerp(viewZ, 1.0, abs(orthoMode));
}gMinRectDimMulUnproject :
(float)ml::Min(rectW, rectH) * unproject前述已经讲过 viewZ * unproject 为视锥体在 viewZ 处的截面高度与屏幕高度的比值,因此 frustumSize 描述的是 viewZ 处截面的高度
1
2
3float blurRadius = gSpecPrepassBlurRadius;
blurRadius *= hitDistFactor * smc;
blurRadius = min( blurRadius, minBlurRadius );
5.1.4 权重参数计算
一些使用到的默认参数
1 | float specNonLinearAccumSpeed = REBLUR_PRE_BLUR_NON_LINEAR_ACCUM_SPEED = 1/9; |
这里的各种权重设计都是基于平常见到的权重之上,再增加一个调控参数设计。对于每项权重,实现上先计算好其所需参数,再最后计算得到权重,这样实现更能够利用MAD指令。最后每项权重都会乘上各自的调控参数,而调控参数都与最后的权重呈反比,细节可查看 4.1.2.6 小节。
float2 geometryWeightParams:用于计算基于平面距离的权重1
2
3
4
5
6
7
8float2 GetGeometryWeightParams(float planeDistSensitivity, float frustumSize, float3 Xv, float3 Nv,
float nonLinearAccumSpeed)
{
float relaxation = lerp(1.0, 0.25, nonLinearAccumSpeed);
float a = relaxation / (planeDistSensitivity * frustumSize);
float b = -dot(Nv, Xv) * a;
return float2(a, b);
}\[ \begin{align} a_g &= \frac{lerp(1.0, \space 0.25,\space 1/9)}{g_{sensitivity} * frustumSize}\\ g_{params} &= \begin{pmatrix}a_g, & -a_g \cdot (N_v \cdot X_v)\end{pmatrix} \end{align} \tag{1}\label{geometry-weight-params} \]
float normalWeightParams:用于计算基于法线夹角的权重。从下式可以看出,这里的设计从specular对法线朝向的敏感度出发,specular lobe angle越小,权重对法线夹角越敏感。
1
2
3
4
5
6
7
8float lobeAngleFractionScale = gLobeAngleFraction * fractionScale; // fraction 参数
float GetNormalWeightParams(float nonLinearAccumSpeed, float fraction, float roughness = 1.0)
{
float angle = STL::ImportanceSampling::GetSpecularLobeHalfAngle(roughness);
angle *= lerp(saturate(fraction), 1.0, nonLinearAccumSpeed); // TODO: use as "percentOfVolume" instead?
return 1.0 / max(angle, REBLUR_NORMAL_ULP); // REBLUR_NORMAL_ULP (2.0 / 255.0)
}\[ \begin{align} a_n &= 1.0 / \Big( halfAngle * lerp(g_{lobeAngleF} * 2.0,\space 1.0,\space 1/9) \Big)\\ n_{params} &= a_n \end{align} \tag{2}\label{normal-weight-params} \]
float2 hitDistanceWeightParams:基于反射距离差异的权重1
2
3
4
5
6
7
8
9
10float2 GetHitDistanceWeightParams(float hitDist, float nonLinearAccumSpeed, float roughness = 1.0)
{
// IMPORTANT: since this weight is exponential, 3% can lead to leaks from bright objects in reflections.
// Even 1% is not enough in some cases, but using a lower value makes things even more fragile
float smc = GetSpecMagicCurve2(roughness);
float norm = lerp(NRD_EPS, 1.0, min(nonLinearAccumSpeed, smc)); // NRD_EPS 1e-6
float a = 1.0 / norm;
float b = hitDist * a;
return float2(a, -b);
}\[ \begin{align} a_h &= 1.0 / \Big( lerp(1\times 10^{-6}, \space 1.0, \space \min(1/9, smc) \Big)\\ h_{params} &= \begin{pmatrix} a_h, & -a_h\cdot hitDist \end{pmatrix} \end{align} \tag{3}\label{hit-weight-params} \]
根据 \(\eqref{hit-weight}\) 可知,超参 \(a_h\) 越大,基于反射距离的权重越小
float2 roughnessWeightParams:用于计算基于roughness差异的计算1
2
3
4
5
6
7float roughnessFractionScale = gRoughnessFraction * fractionScale; // fraction 参数
float2 GetRoughnessWeightParams(float roughness, float fraction)
{
float a = rcp(lerp(0.01, 1.0, saturate(roughness * fraction)));
float b = roughness * a;
return float2(a, -b);
}\[ \begin{align} a_r &= 1.0 / \Big(lerp(0.01, \space 1.0,\space roughness * g_{roughness} * 2.0)\Big)\\ r_{params} &= \begin{pmatrix} a_r, & -a_r \cdot roughness \end{pmatrix} \end{align} \tag{4}\label{roughness-weight-params} \]
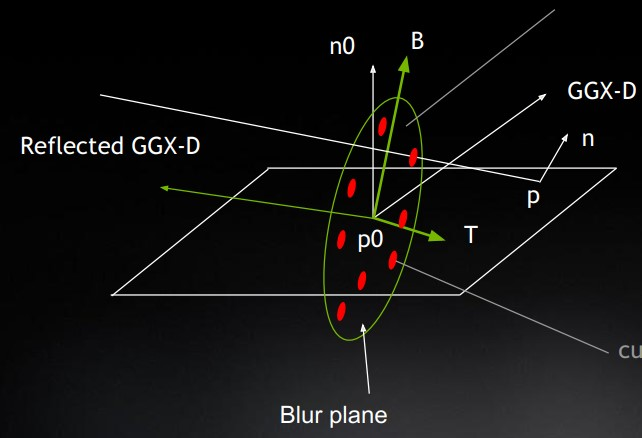
5.1.5 Sampling Space
TB坐标系轴
1
float2x3 TvBv = GetKernelBasis(Dv.xyz, Nv, NoD, roughness, specNonLinearAccumSpeed);
blurRadius 转为世界空间下的 worldRadius,对TB进行缩放
TvBv[0] *= worldRadius; TvBv[1] *= worldRadius;
5.1.6 Poisson Sampling
当前样本的 uv 偏移量:泊松样本生成二维向量,再乘上 blurRadius * texelSize
1
float2 uv = pixelUv + STL::Geometry::RotateVector( rotator, offset.xy ) * gInvScreenSize * blurRadius;
offset:(x, y) 是单位圆盘内的点坐标,z 是点距圆心的距离如果是checkboard模式(gSpecCheckerboard != 2),当前采样样本是否有有效数据,如果没有则向左或向右偏移一个,表示取相邻像素数据
采样当前样本的 viewZ 与 spec,以及得到当前样本在view space的坐标 Xvs
计算当前样本的权重,为下面几项的乘积
比较当前样本与像素的材质ID,材质ID不同,返回权重 0,相同返回 1。
gaussian权重:当前样本在单位泊松盘中距圆心的距离 offset.z,代入权重
exp(-0.66 * r * r)使用计算好的权重参数计算 combinded weight:包括基于平面距离的权重、基于法线夹角的权重、基于粗糙度差异的权重,三项乘积
1
2
3
4
5
6
7
8
9
10
11
12
13
14
15
16
17
18
19float GetCombinedWeight(
float2 geometryWeightParams, float3 Nv, float3 Xvs,
float normalWeightParams, float3 N, float4 Ns, // Ns = (sample normal, sample roughness), N 当前像素的世界空间法线
float2 roughnessWeightParams = 0
) {
float3 a = float3(geometryWeightParams.x, normalWeightParams, roughnessWeightParams.x);
float3 b = float3(geometryWeightParams.y, 0.0, roughnessWeightParams.y);
float3 t;
t.x = dot(Nv, Xvs);
t.y = STL::Math::AcosApprox(saturate(dot(N, Ns.xyz)));
t.z = Ns.w;
float3 w = _ComputeWeight(t, a, b);
return w.x * w.y * w.z;
}
// _ComputeWeight根据 \(\eqref{geometry-weight-params}\)、\(\eqref{normal-weight-params}\)、\(\eqref{roughness-weight-params}\) 可简化上述代码 \[ \begin{align} a &= \begin{pmatrix} a_g, & a_n, & a_r \end{pmatrix} \\ b &= \begin{pmatrix} -a_g \cdot (N_v \cdot X_v), & 0, & -a_r\cdot roughness \end{pmatrix} \\ t &= \begin{pmatrix} N_v \cdot X_{vs}, & \arccos(N\cdot N_s), & r_s\end{pmatrix} \\ X = t * a + b &= \begin{pmatrix} a_g \cdot (N_v \cdot X_{vs} - N_v\cdot X_v), &a_n \cdot \arccos(N\cdot N_s), &a_r\cdot (r_s - roughness)\end{pmatrix} \end{align} \tag{5} \label{combined-weight} \] STL::Math::SmoothStep 的定义如下
1
2
3
4
float3 SmoothStep01(float3 x) { return _SmoothStep01(saturate(x)); }
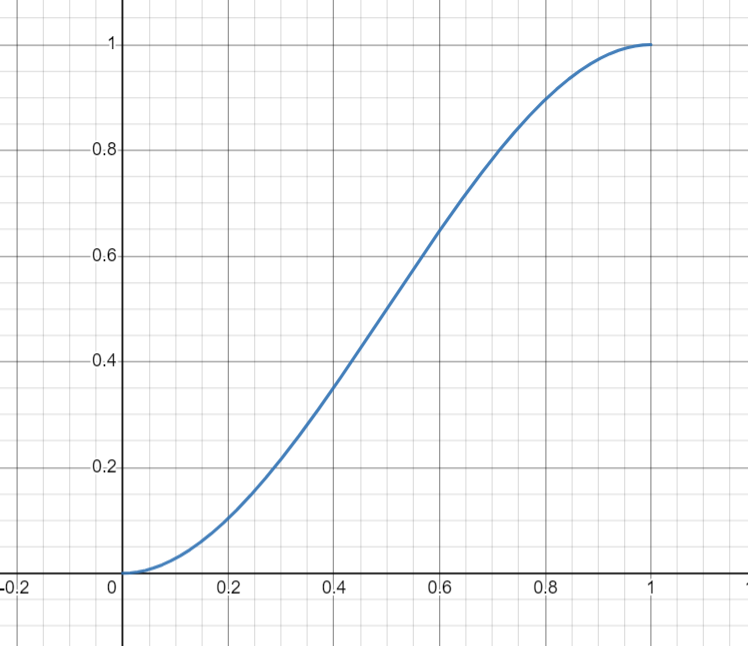
float3 SmoothStep(float3 a, float3 b, float3 x) { x = _LinearStep(a, b, x); return _SmoothStep01(x); }\[ x = saturate\left(\frac{x-a}{b-a}\right) \\ w=\_SmoothStep01(x) = x^2 \cdot (3 - 2x) \]
_LinearStep 中 a<b,则得到的是反比关系。因此 \(X\) 由 0.001 ~ 0.999 递增,w 由 1 到 0递减。当 \(X<=0.001\) 时,w = 1;当 \(X >= 0.999\) 时,w = 0
_SmoothStep01 得到的是在0,1两端更平缓的效果,图像如下所示
\(\eqref{combined-weight}\) 式计算的每项权重的意义:
\(a_g \cdot (N_v \cdot X_{vs} - N_v\cdot X_v)\) :小括号里是样本到当前像素平面的距离,基于平面距离的几何权重,距离越小对应权重越大
\(a_n \cdot \arccos(N\cdot N_s)\):样本法线与当前像素法线的夹角,夹角越小对应权重越大
\(a_r\cdot (r_s - roughness)\):样本粗糙度与当前像素粗糙度的差值(后面有取绝对值),差值越小对应权重越大
因此这些权重的设计都是基于平常所见到的设计,但在此之上还有复杂超参设计,即 \(a_g,a_n,a_r\)
基于反射距离的权重:使用一个最小权重到1.0之间的插值,
lerp(minHitDistWeight, 1.0, ...)最小权重:
float minHitDistWeight1
float minHitDistWeight = REBLUR_HIT_DIST_MIN_WEIGHT * fractionScale; // REBLUR_HIT_DIST_MIN_WEIGHT 0.1
基于反射距离差异的权重作为插值权重
1
2
3
4
5
6
float GetHitDistanceWeight(float2 params, float hitDist) // 样本的反射距离
{
return _ComputeExponentialWeight(hitDist, params.x, params.y);
}代入 \(\eqref{hit-weight-params}\) 定义的 params,有 \[ \exp\Big(-3 \cdot abs(s_{hitDist} \cdot a_h - a_h \cdot hitDist)\Big) = \exp\Big(-3 \cdot abs\big(a_h\cdot (s_{hitDist}-hitDist)\big)\Big) \tag{6} \label{hit-weight} \]
处理样本距反射物距离影响,距离越近,反射越shaper。但为什么roughness越大,权重越大:question::confused:
1
2
3
4float d = length(Xvs - Xv); // 当前样本到像素的距离
float h = ExtractHitDist(s) * hitDistScale; // roughness weight will handle the rest,当前样本的反射距离
float t = h / (hitDist + d); // hitDist 为当前像素的反射距离
w *= lerp(saturate(t), 1.0, STL::Math::LinearStep(0.5, 1.0, roughness));
样本speular的加权平均 如果checkboard模式最终带来无效数据,则使用当前像素的左右相邻像素、进行bilateral filter
5.2 Temporal Accumulation
5.2.1 估算沿运动方向的 curvature
5.2.1.1 着色点的运动方向
将相机的运动转为着色点的运动 Xprev -
gCameraDelta(将上一帧的着色点施加上一帧相机到当前帧的运动),再变换到当前帧
screen uv空间,得到运动后的着色点的
motionUv。因此,uv空间的运动方向
cameraMotion2d 计算如下
1 | cameraMotion2d = normalize((motionUV-pixelUV) * gRectSize) * gInvRectSize; // 转为像素单位标准化,再转为uv单位 |
注意:这里的 cameraMotion2d 不只是相机的运动矢量,如果着色点具有动画,由于 Xprev 是动画前的世界坐标,因此还有动画带来的运动
接下来选择两个运动方向上的视差点,基于这两点以及着色点的法线、位置以及观察方向来计算曲率:
在运动方向上走一个单位得到一个低 parallax 点
float2 uv = pixelUv + cameraMotion2d * 0.99;在运动方向上走前述计算的视差距离个单位
float2 uvHigh = pixelUv + cameraMotion2d * smbParallaxInPixels;
5.2.1.2 Low parallax
像素的bilinear区域以及描述定义如下
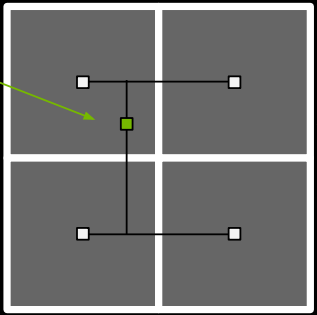
Bilinear f的定义与计算如下,origin 是 bilinear 2x2
区域起始坐标(像素单位),weights是距 origin 像素中心的偏移量
1 | struct Bilinear |
当前像素的bilinear区域考虑了小的视差,所位于的bilinear区域大多在Preload的数据
s_Normal_MinHitDist中。存储位置计算如下1
2
3// threadPos+BORDER为当前像素在tile数据中的位置,int2(f.origin)-pixelPos为bilinear区域相对于当前像素的偏移量
int2 pos = threadPos + BORDER + int2(f.origin) - pixelPos;
pos = clamp(pos, 0, int2(BUFFER_X, BUFFER_Y) - 2);Bilinear filter后的法线
n,2x2区域的4个像素的法线为 n00 (pos + (0, 0))、n10 (pos + (1, 0))、n01 (pos + (0, 1))、n11 (pos + (1, 1)) bilinear计算如下,两个水平方向的插值,再加上一个垂直方向的插值1
lerp(lerp(s00, s10, f.weights.x), lerp(s01, s11, f.weights.x), f.weights.y);
5.2.1.3 High parallax
与 low parallax 计算normal不同的是 uvHigh
的视差较大,因此其bilinear区域大多不在preload
tile数据内,从贴图中采样并执行 bilinear filter,得到
nHigh。
同时bilinear filter uvHigh 的 view
space深度得到zHigh。计算 zHigh 与当前着色点 viewZ
之间的相对误差
1 | float zError = abs(zHigh - viewZ) * rcp(max(zHigh, viewZ)); |
如果相对误差 zError < 0.1,则选择high parallax的
uvHigh 与 nHigh;否则,选择 low parallax 的 uv 与 n。
5.2.1.4 计算 curvature
使用当前像素的
X(世界坐标)、N(法线)、Navg
以及所选parallax 点的
v(世界空间观察方向)、n(世界空间法线)计算这两点曲率
:question:
5.2.5 累积速度更新
本例中 gSpecMaterialMask = 0,因此 specOcclusionWeights
采用前面计算的不带材质比较的
smbOcclusionWeights;specHistoryConfidence 采用
smbFootprintQuality,即smbPixelUv的bilinear区域的可信度。
历史帧smbPixelUv的bilinear区域的累积速度
specAccumSpeeds,使用specOcclusionWeights得到加权平均specAccumSpeed。根据bilinear区域的可信度调整历史信息的累积帧数:如果
confidence = 1,累积帧数不变;如果confidence <
1,累积帧数减小,则混合权重更倾向于当前帧。
1 | // specAccumSpeed *= ((specAccumSpeed * confidence + 1) / (1 + specAccumSpeed)); |
注意:累积速度在保存时除以最大累积帧数
REBLUR_MAX_ACCUM_FRAME_NUM(63),在提取时再乘上最大累积帧数。因此计算过程中,表示的是历史帧信息的累积帧数
5.2.6 Virtual motion based reprojection
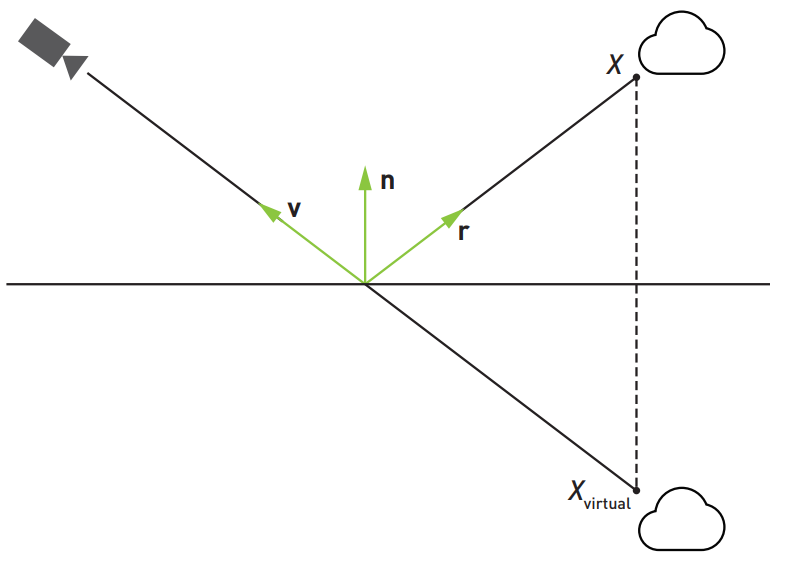
对于反射的重投影,反射的世界具有自己的运动,例如反射点具有动画,而着色点与相机是静止的,这时着色点的反射也发生了运动。而反射点的运动常常使用虚拟反射点来追踪,如上图所示的镜面反射的虚拟反射点可以通过在着色点处,沿着相机到着色点的方向延长反射距离得到,计算如下
1 | float3 Xvirtual = X - V * hitDist; |
但这种方法只对镜面反射有效,而实际的glossy反射,虚拟反射点会更加接近表面。
计算虚拟反射点
Xvirtual对preload阶段得到的当前像素2x2区域最小反射距离进行一定scale
hitDistForTracking *= hitDistScale计算着色点处的GGX Dominant Direction
float4 D,D.w 是 n 到 r(镜面反射方向) 的插值,roughness增大会导致specular lobe主方向偏向法线。虚拟反射点计算如下:question:
1
2
3
4
5
6
7
8
9
10
11
12float ApplyThinLensEquation( float NoV, float hitDist, float curvature )
{ // https://www.geeksforgeeks.org/sign-convention-for-spherical-mirrors/
float hitDistFocused = hitDist / (2.0 * curvature * hitDist * NoV + 1.0);
return hitDistFocused;
}
float3 GetXvirtual(float NoV, float hitDist, float curvature, float3 X, float3 Xprev, float3 V, float dominantFactor)
{
float hitDistFocused = ApplyThinLensEquation(NoV, hitDist, curvature);
float closenessToSurface = saturate(abs(hitDistFocused) / (hitDist + NRD_EPS));
return lerp(Xprev, X, closenessToSurface * dominantFactor) - V * hitDistFocused * dominantFactor;
}Xvritual 变换到上一帧screen uv空间,得到
vmbPixelUv使用虚拟反射点与着色点在上一帧的像素距离
vmbPixelsTraveled表达virtual motion1
2float2 vmbDelta = vmbPixelUv - smbPixelUv;
float vmbPixelsTraveled = length(vmbDelta * gRectSize);根据virtual motion对curvature进行调整,再重新计算上述虚拟反射点相关变量,例如 Xvirtual、vmbPixelUv、vmbDelta、vmbPixelsTraveled。
1
2float curvatureCorrection = float(vmbPixelsTraveled < 3.0 * smbParallaxInPixels + gInvRectSize.x);
curvature *= curvatureCorrection;
occlusion判断:虚拟反射点在上一帧的vmbPixelUv,对应bilinear区域
vmbBilinearFilter,计算该区域的occlusion。获取上一帧数据:
vmbViewZs:vmbBilinearFilter区域的view zvmbVv:vmbPixelUv像素取view z = 1得到的view space坐标,指向vmbPixelUv像素并且z=1的view space下的向量Nvprev:当前帧像素的Navg转到上一帧view space
使用到着色点平面的距离的差异来评估occlusion
上一帧bilinear区域到着色点平面的距离计算如下
1
2
3float4 NoX = (Nvprev.x * vmbVv.x + Nvprev.y * vmbVv.y) * (gOrthoMode == 0 ? vmbViewZs : gOrthoMode) + Nvprev.z * vmbVv.z * vmbViewZs;
// gOrthoMode = 0
NoX = vmbViewZs * dot(Nvprev, vmbVv);由于 vmbVv 是 vmbPixelUv像素在 view z = 1 的点,通过变换可以得到 vmbViewZs * vmbVv 则是bilinear区域的四个点(这里忽略了像素点的不同)。因此NoX计算的是bilinear区域4个点到着色点平面法线的距离(这里的平面方程常数项为0)
着色点在上一帧的平面方程常数项:
float NoXreal = dot(Navg, X - gCameraDelta);由于 Navg 位于世界空间,因此到上一帧世界空间不需要变换
X - gCameraDelta:着色点世界坐标变换到上一帧的世界空间。
注意,正常情况下是不需要此变换的,因为世界空间是绝对的,但由于前面所述,这里的变换都取消掉了当前帧的相机平移,也就是以当前帧相机为原点。
简单推导:gCameraDelta是指向上一帧的相机运动向量,X是当前帧着色点的世界坐标,又是(着色点->相机)的向量。因此 X-gCameraDelta为(上一帧相机->着色点)的向量。
dot(Navg, x-gCameraDelta) = ||Navg|| * ||x-gCameraDelta|| * cos = ||x-gCameraDelta|| * cos
相当于将 Navg与X转到上一帧的view space 下,再求平面方程常数项。保持与 NoX 的坐标空间一致。
float4 vmbPlaneDist = abs(NoX-NoXreal):计算的是虚拟反射点在上一帧对应的bilinear区域到着色点平面的距离。
float4 vmbOcclusion = step(vmbPlaneDist, disocclusionThresholdMulFrustumSize);之后就和surface motion计算类似
float4 vmbOcclusionWeights:bilinear权重施加vmbOcclusion 得到是否可以使用 catrom filter:
1
2bool vmbAllowCatRom = dot( vmbOcclusion, 1.0 ) > 3.5 && REBLUR_USE_CATROM_FOR_VIRTUAL_MOTION_IN_TA;
vmbAllowCatRom = vmbAllowCatRom && specAllowCatRom;bilinear可信度
vmbFootprintQuality: 对 vmbOcclusion 执行 bilinear filter 再开方得到
5.2.6.1 累积速度更新
使用 vmbBilinearGatherUv 获取上一帧 vmbBilinearFilter
区域的累积速度,使用vmbOcclusionWeights加权平均得到
vmbSpecAccumSpeed,再使用 vmbBilinearFilter
区域的可信度调整累积速度
1 | // vmbSpecAccumSpeed *= ((vmbSpecAccumSpeed * confidence + 1) / (1 + vmbSpecAccumSpeed)); |
与surface motion不同的是,最大帧数进行了如下限制,本例中
gResponsiveAccumulationRoughnessThreshold=0,因此无作用
1 | float GetResponsiveAccumulationAmount(float roughness) |
5.2.6.2 Surface 与 Virtual 之间的混合权重
virtualHistoryAmount,用于混合 virtual-motion based 与
surface-motion based重投影。
初始为 GGX-D 的 lerpFactor
1
float virtualHistoryAmount = IsInScreen(vmbPixelUv) * D.w;
virtual motion的bilinear区域可信度
vmbFootprintQuality1
virtualHistoryAmount *= saturate(vmbFootprintQuality / 0.5);
normal:根据着色点法线
N与虚拟反射点法线vmbN、virtual motion走过的弧度angle得到virtualHistoryNormalBasedConfidence1
virtualHistoryAmount *= lerp(1.0 - saturate(vmbPixelsTraveled), 1.0, virtualHistoryNormalBasedConfidence)
back-facing: 虚拟反射点法线 vmbN 与着色点的平均法线 Navg。
1
virtualHistoryAmount *= float(dot(vmbN, Navg) > 0.0)
roughness:
virtualHistoryRoughnessBasedConfidence1
virtualHistoryAmount *= lerp(1.0 - saturate(vmbPixelsTraveled), 1.0, virtualHistoryRoughnessBasedConfidence)
在virtual motion方向上的少量像素累积roughness权重
wr1
2virtualHistoryAmount *= 0.1 + wr * 0.9;
virtualHistoryRoughnessBasedConfidence *= wr;
5.2.7 混合
5.2.7.1 历史数据filter
当 specAllowCatRom == true时,使用 catrom
filter;否则使用 specOcclusionWeights 进行bilinear
filter,得到着色点在上一帧的specular历史filter结果
smbSpecHistory, smbSpecFastHistory。
同理,当 vmbAllowCatRom == true时,使用 catrom
filter;否则使用 vmbOcclusionWeights 进行bilinear
filter,得到虚拟反射点在上一帧的 specular
历史filter结果vmbSpecHistory, vmbSpecFastHistory
SpecHistory 是 float4(radiance, dist),SpecFastHistory 是 float2(luma, hitDistForTrackingPrev)
5.2.7.2 virtual history confidence
用于历史radiance clamp,以及控制累积速度
virtual parallax difference:使用 SpecFastHistory 的 hitDist 得到虚拟反射点
XvirtualPrev,变换到上一帧的sreen uv空间得到vmbPixelUvPrev。得到与 vmbPixelUv的像素距离deltaParallaxInPixels1
2// lobeRadiusInPixels 着色点处反射lobe半径
float virtualHistoryConfidence = STL::Math::SmoothStep(lobeRadiusInPixels + 0.25, 0.0, deltaParallaxInPixels);在virtual motion方向上的少量像素累积roughness权重
wr、normal权重w11
virtualHistoryConfidence *= isInScreen ? w1 : 1.0;
5.2.7.3 累积速度与混合权重更新
vmbSpecAccumSpeed *= virtualHistoryConfidence;
surface motion based:smbSpecAccumSpeed
由 virtualHistoryAmount 混合得到最终的
specAccumSpeed
1 | virtualHistoryAmount *= saturate(vmbSpecAccumSpeed / (smbSpecAccumSpeed + NRD_EPS)); // gNonReferenceAccumulation = 1 |
5.2.7.4 Specular 混合
混合速度选用
float specNonLinearAccumSpeed = 1.0 / (1.0 + specAccumSpeed);当checkboard模式下,当前无有效数据时,
specNonLinearAccumSpeed *= lerp(1.0 - gCheckerboardResolveAccumSpeed, 1.0, specNonLinearAccumSpeed);混合surface motion 与 virtual motion的历史specular:
specHistory = lerp(smbSpecHistory, vmbSpecHistory, virtualHistoryAmount);混合历史specular与当前specular 得到最终累积结果
specResult1
2
3
4
5
6
7
8specResult = MixHistoryAndCurrent(specHistory, spec, specNonLinearAccumSpeed, roughnessModified);
float4 MixHistoryAndCurrent(float4 history, float4 current, float f, float roughness = 1.0)
{
float4 r;
r.xyz = lerp(history.xyz, current.xyz, f);
r.w = lerp(history.w, current.w, max(f, GetMinAllowedLimitForHitDistNonLinearAccumSpeed(roughness)));
return r;
}specular混合结果的 hit dist 与 lum矫正(Anti-firefly suppressor)
1
2
3
// REBLUR_FIREFLY_SUPPRESSOR_RADIUS_SCALE 0.1, gBlurRadius 15
float specAntifireflyFactor = specAccumSpeed * gBlurRadius * REBLUR_FIREFLY_SUPPRESSOR_RADIUS_SCALE * smc;
specAntifireflyFactor /= 1.0 + specAntifireflyFactor;virtual motion 与 surface motion 的混合结果 与 最终时序累积结果之间的混合
fast history混合
计算误差 GetColorErrorForAdaptiveRadiusScale,之后blur基于此调整blur radius
5.3 History Fix
5.3.1 Preload
从 fast history 加载 lum 到
float s_SpecLuma[BUFFER_Y][BUFFER_X]
5.3.2 History Reconstruction
当累积帧数相对于 gHistoryFixFrameNum 小于
(1-REBLUR_HISTORY_FIX_THRESHOLD_1) 比例时 (0.111),执行 history
reconstruction。
采样步长
scale.y(像素单位):与前面计算相同,得到specular lobe的lobeRadius(世界空间),再转到屏幕空间得到minBlurRadius1
2// gHistoryFixStrideBetweenSamples = 14.0,frameNum 是 gHistoryFixFrameNum 范围内的平滑帧数
scale.y = min(gHistoryFixStrideBetweenSamples / (2.0 + frameNum.y), minBlurRadius / 2.0);权重参数:normal、geometry、roughness 与之前计算相同
在 [-2, 2] x [-2, 2] 区域进行加权平均specular得到
spec,- 每个样本为
float2 uv = pixelUv + float2(i, j) * gInvRectSize * scale.y; - 使用权重参数计算每个样本的权重
- 每个样本为
在以当前像素为中心的 (BORDER * 2 + 1) x (BORDER * 2 + 1) 区域计算 luma 一阶矩
specM1、二阶矩specM2。每个样本的luma数据都在shared data
s_SpecLuma中如果开启了 antiFirefly ,则在 [-4, 4] x [-4, 4] 区域计算 luma 的一阶矩 m1、二阶矩 m2,限制filter结果spec的luma
specLumaclamp(specLuma, m1-sigma, m1+sigma),sigma为标准差使用 specM1、specM2以及当前像素的lum specCenter 对 specLuma 进行 clamp 得到
specLumaClamped1
2
3float specMin = min(specM1 - specSigma, specCenter);
float specMax = max(specM1 + specSigma, specCenter);
float specLumaClamped = clamp(specLuma, specMin, specMax);specLumaClamped 到 specLuma 之间的插值得到最终的 specLuma,插值权重由累积帧数决定
1
2specLuma = lerp(specLumaClamped, specLuma,
1.0 / (1.0 + float(gMaxFastAccumulatedFrameNum < gMaxAccumulatedFrameNum) * frameNumUnclamped.y));
对filter结果ChangeLuma得到最终输出
spec = ChangeLuma(spec, specLuma);
Appendix
1 GGX Dominant Direction
Off-Specular 现象:通常都认为 BRDF lobe 是以镜面反射方向为中心,但由于光源方向与 shadow-masking 项,在 roughness 增大时,BRDF lobe 会朝着法线方向偏移,称为 Off-specular peak。如下图所示 [1](page 69)
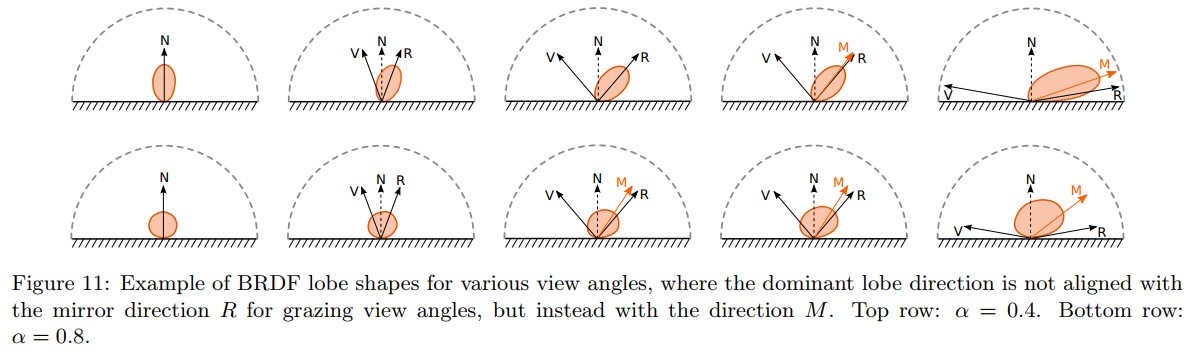
为了模拟这种变化,引入一个参数 lerpFactor 来得到法线到镜面反射方向之间的dominant direction,即
1 | lerp(N, R, lerpFactor); |
这个 lerpFactor 使用 roughness、NoV来建模。在reblur的实现中,
float4 GetSpecularDominantDirection 返回 (dominant
direction, lerpFactor)
Reference
[1] https://seblagarde.files.wordpress.com/2015/07/course_notes_moving_frostbite_to_pbr_v32.pdf